Author: Kory Ponting
Pen Testing REST API with Burp Suite
Introduction:
Welcome to our 3-part blog series where we will take a dive into the technical aspects of conducting exhaustive penetration tests against REST API services, generating reports based on what tests were performed, and what our findings are. Due to the subject matter being relatively technical, I’m making some assumptions that you will be at least familiar with the concepts behind conducting penetration testing and vulnerability analysis. That said, if you happen to have a RESTful API service that you’re looking to conduct a penetration test against, then make sure to stick with me as we dig into the specifics for how to make sure you leave no stone unturned.
Part 1 will be covering the dos and don’ts of configuring and optimizing our scan engine to make sure we’re set for success. Part 2 will consist of the actual penetration testing itself, and Part 3 will be on formatting our results and generating a detailed report. I hope this series will be helpful to my fellow security enthusiasts of all skill levels. Please feel free to reach out to me or comment below if you ever have any questions or comments on Burp Suite and I’ll make sure to help in any way I can. Now let’s get started!
History: What is an API?
More and more companies have been expanding their target audience by extending their host of web services to others and providing interfaces for automated services, such as a Single Sign-On (SSO) using an Application Programming Interface (API). APIs typically provide all the same services that a web application of the same provider supplies, just without the use of a graphical interface. APIs are meant to act as an interface for answering automated requests, typically provided by processes instead of people. Because of this interface, a specific ruleset exists for being able to communicate with an API correctly, and in this blog we are going to be looking at how to properly test these services for security vulnerabilities using Portswigger’s tool, Burp Suite.
Why Burp Suite?
Burp Suite is an incredibly powerful web application proxy that also performs security vulnerability analysis. Many security experts will tell you that it provides you with the most return on your investment. For a mere $350 license, you can unlock the “Pro” mode and hack to your heart’s content, which is something many of their competitors can’t say. It isn’t, however, without its shortcomings. Configuring and using Burp Suite to provide you with the results you are looking for can be difficult for anyone not well versed with the ins and outs of the types of attacks that are to be tested; even more so when conducting penetration tests on web APIs.
Rules of Engagement:
Before beginning, it’s important to note that due to the nature of this article, I assume the reader understands the correct use-case scenarios for when penetration testing is and isn’t allowed against a host service, and thus I and MindPoint Group are not responsible for actions taken on the reader’s behalf. Only use these instructions to test APIs that you are permitted to test, either your own or your customers (if you have a written Rules of Engagement (ROE) agreement outlining the scope of your testing!). If you are new or interested in entering the penetration testing or vulnerability analysis field, please reach out to me personally and I’d be happy to help you get started down the right path.
Let’s begin - Scoping:
The scope determines how the penetration test is performed and how much we may or may not know about the RESTful API service in question. For whitebox and greybox tests, we could have full documentation, use-case scenarios, and even stock JavaScript Object Notation (JSON) request tokens outlining the structure of the HTTP packets the API accepts. For blackbox tests, however, we’ll have to build our packets through trial and error using API debugging/mapping tools, such as Postman, and by capturing valid requests/responses using Burp Suite as a proxy service. Due to time constraints of most tests, it’s usually more cost effective to aim for whitebox tests. Whitebox tests provide the assessor with all the information they need so they can correctly identify and focus on attacking the weakest links as quickly and effectively as possible. Also, due to the destructive nature of the types of tests we’re conducting, it’s important that all parties involved understand the risks of these types of tests we’re conducting and that we’re testing only targets in the specified scope.
For the case in this blog, we’re going to be using Damn Vulnerable Web Service (DVWS) for our test scenarios. It’s a very simple and easy to use webservice that supports a vulnerable RESTful API we can test.
Reconnaissance:
Starting any typical penetration test will involve a substantial amount of research, typically referred to as information gathering. Ask questions such as: What is the target’s digital footprint? Where is the target’s lowest hanging fruit? These are the questions we’re most interested in answering first.
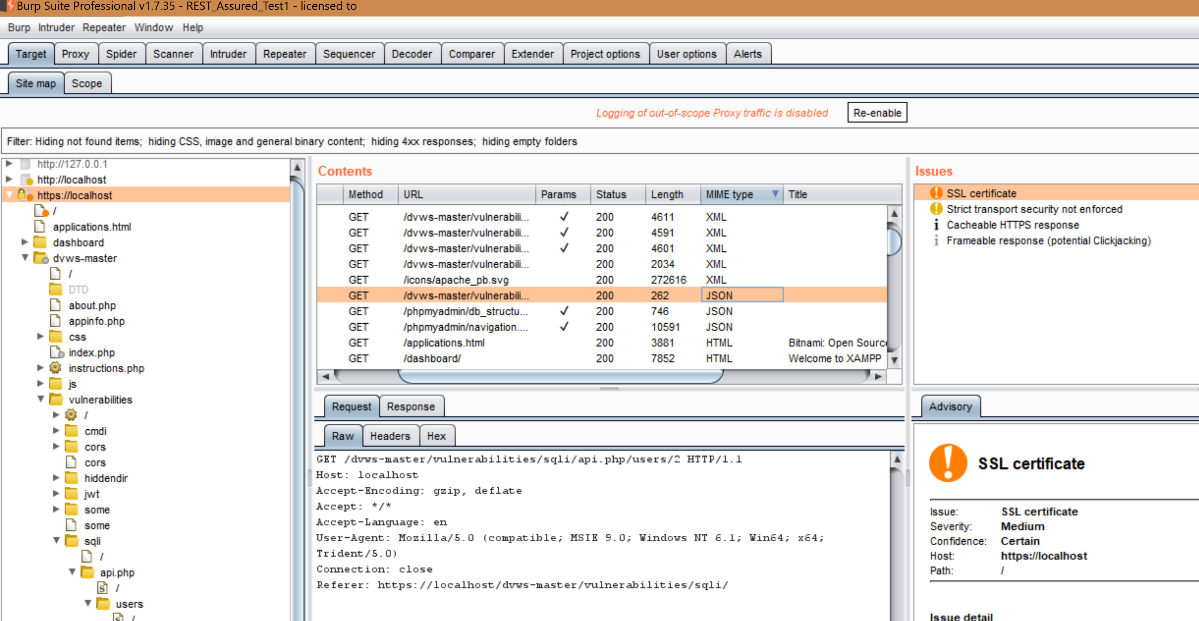
Browsing
- Typically, you usually won’t be able to find API services by simply navigating a site and finding a link. While google hacking is a little outside the topic of this blog, there are a plethora of ways to discover APIs for a targeted host site. A number of different API aggregators or search engines exist (such as our friends at ProgrammableWeb.com), which would be a great place to start to see if a target’s API has been publicly cataloged or documented. We can also leverage Burp Suite’s web spider functionality to try to discover API pages. After manually navigating your target’s website while capturing traffic into Burp’s proxy and adding the site to your selected scope (right-click the target site in Target>Site Map, add to scope), perform a crawl by selecting the host URL and right-click > Spider this host. Once complete, if we navigate to the root of the site and sort the results by MIME type. We can look for JSON, which could indicate a RESTful API.
Postman
- I’ve picked up the use of Postman through some developers I know that use it to help with their debugging throughout the API development process. I’ve found it to be quite useful and it can assist us in a similar manner of getting started with known-good API requests, and then we can begin our testing from there. The API we’re testing in DVWS is extremely simple, but in the real world you can expect to see JSON requests full of variables and parameters and look something like the following request:

- Next, we can configure Postman to communicate correctly to the host API:

- We can then permit the proxy service to enable Burp Suite’s proxy to capture the traffic, allowing us to start getting our hands dirty:

Burp Suite
- Now, let’s send a known-good request to our target API through Postman and verify we captured it in Burp Suite:

- If we right-click anywhere in the raw message, we can send it to a number of different parts of Burp Suite, but let’s start by sending it to Repeater. From here we can use Burp Suite’s Repeater function as basically our own Postman and we can replay this packet any number of times, performing minor manual tweaks and observing the response. Using Burp Suite’s Repeater, I’ll take the time to check the server’s responses to our requests while I make minor changes to the packet in different areas to see what types of error messages the server responds with. Once I get a feel with how many different types of error messages and responses the application yields, I’ll right-click the body of the known-good request and send it to the intruder. This is where it gets interesting.
Configuring
First, before we dive into the depths of the hands-on parts, I feel it’s necessary to do some of the configuring I’ll expand on below. These recommendations are all based on trial and error on my part for dealing with Burp Suites’ lack of good reporting features. It’s one thing to conduct an exhaustive penetration test, and it’s another thing to have thorough, well-defined start and stop points on what tests were and were not performed, and what their results were. All that said, I feel that Burp Suite is lacking when it comes to API vulnerability reporting, which is unusual considering their regular write-ups are relatively good for its vulnerability analysis end. Not to be worried though! With my help, I’ll have you impressing your bosses’ boss with the amount of metrics we can show them to back up our claims.
On the Intruder > Positions tab, make sure Attack Type is set to “Sniper.” This is important when it comes to generating our report, as this will fire attacks off in sequential order making our packets sent/received much easier to interpret what attack triggered what response.
Make sure to correctly define your positions by selecting all of your parameters and clicking “Add §.” This will tell Burp Suite where exactly in the message it will conduct its injections. In this test scenario, we’re telling Burp to inject in the URL parameter number for the user value, but most tests will also select parameters in the body. The Sniper attack will work through each of these positions sequentially, top-to-bottom. So, when we look at the results and it says “attack position: 1” it will be the first “§” value we defined.

Now, on to the Payloads tab. This is where some of your personal preference will come into play. I prefer to separate my types of penetration tests apart as it makes reporting and logging much easier. So, we’ll be breaking up SQL injections from XSS injections, for example. Because of this, we want to separate out the payloads. Under Payload Options, there’s a pulldown for “add from list.” We’ll want to select “Fuzzing – SQL Injection.” Keep in mind we’ll have to go through each attack type and generate separate reports for each type. Later, we can add them together as one giant report if we want, but we want to make sure we don’t miss anything. Also, it’s worth noting, if we wanted to use another list of attacks, we can certainly import something like Wfuzz’s wordlists of attacks. Feel free to go as deep in this category as you want. The more attacks the merrier! The Payload Processing in Burp Suite gives us additional options to do things such as character replacement for things like “<yourservername>” and “<youremail>” to substitute with a string that is applicable for the attack. Flip through the different lists to get a feel for what characters you want to substitute and with what. It’s also possible to encode/decode our attack strings to bypass things such as input filtering. If no attacks are working, keep cycling through these options to see if anything is even possible with these options.
So, we’re almost ready to start, however there’s one last thing I’d strongly advise doing: throttling. I’d recommend changing these values from the default under options: Number of threads: 1, Throttle (milliseconds): 20.

This configuration will be different for every API. Also, I will warn you that Burp Suite will do something a little odd here, and this took me way too long to figure out on my own than I’d like to admit, but my only way to combat it was to use a single thread and throttle it. When exporting your results (post-scan), Burp Suite will store the responses from the target in a different order than it lists in the attack results window. The first 10-15 results should be in the same order; however, if you navigate to Save > Server Responses, the order of the response packets will almost always be out of order by the time you get to the 40th or so packet. I’m not 100% sure on why this happens, but in my testing, I believe it happens when one of the thread’s requests takes longer to process than another’s request, so that the response ends up out of order on the received end in the proxy. Burp’s session management throughout the testing maintains the session information correctly, but I think the proxy or logging isn’t maintaining the order properly. So, when a data dump of the responses is generated, Burp dumps the packets in the order they were received, not paired with the correct request number. It really is unfortunate because this causes larger-scale scans to take significantly longer, but if you care about providing accurate artifacts at the end of your testing, it is necessary. If reporting isn’t your thing, then you can skip this step.
What's Next?
In this blog, we reviewed configuration of Burp Suite. In our Part 2 of this blog series, we review PenTesting. In Part 3, we review PenTest reporting.
Learn more about how MindPoint Group can help bulletproof your applications with PenTesting.


